Physical Properties of Rubber
Written by Dale T. McGrosky
In this article we will describe the physical properties of rubber that you will see on a physical property data sheets for elastomers that are tested to ASTM D2000 specifications. I have described what the property is, why it is important, and how you test it. There are many more physical properties of rubber than what are described here, but, we will limit them to the most common physical properties you will see in the ASTM D2000 standard.
First we will cover Hardness, Ultimate Tensile Strength, Elongation, Tensile Set, Young’s Modulus and Yield Strength. The results of these properties, except Hardness and Tensile Set, are from tension stress which is recorded on the stress-strain curve that is generated during a Ultimate Tensile Strength test. Later will cover Tear Resistance, Compression Set, Ozone Resistance, Fluid Resistance, Low Temperature Resistance were sheer and compressive forces are applied to the specimen. ASTM D1043 and D1053 are used to measure the stiffness (modulus of rigidity) of a sample while
applying torsional force on a specimen chilled to a specific temperature.
Forces
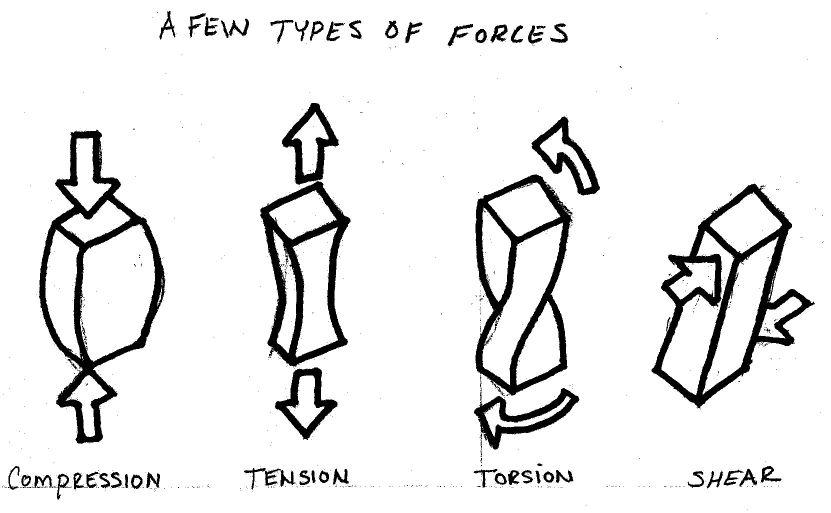
Figure Caption “Figure 1 – Types of Forces”
Lets take a quick look at some forces before we get started on explaining properties. These forces will be applied to the specimen during testing. Being familiar with these will also give you and
understanding of the forces that may be applied to the rubber parts while in your application.
Lets take a rectangular block of rubber as a specimen. If you squeeze the small sides together this is compressive force. If you stretch the block, this is tension or tensile force. If you twist the block this is torsional force and if you apply an opposing force to the side on top and opposite side on bottom, this is shear force. Some of these forces will be applied to the specimen during testing.
Hardness
Hardness is the measure of how resistant solid material is when a force is applied. There are 3 main type of hardness measurements, scratch, indentation and rebound. We will only be talking about the indentation hardness for elastomers. Indentation hardness is the materials resistance to indentation by an indentor.
Rubber is made in different hardness’ for several reasons. Some sealing surfaces may not be totally smooth. The little voids, pits and scratches allow a pathway for fluid or air to escape through. Softer materials tend to flow better into these voids and imperfections on the sealing surface creating a better seal. On the other hand, harder rubbers will not do this as well but they do resist extrusion cause by high pressures. Also, coefficient of friction is also affected by the hardness of the rubber. Softer rubber has a higher coefficient of friction and harder rubber has a lower coefficient of friction. Coefficient of friction plays a factor when the rubber seal is sealing a part that moves.
Testing Hardness
The durometer gauge is used to test the hardness of elastomers. The 3 most common durometer gauges used to measure rubber are Type A, Type M and Type D. Type A is used to test soft rubber materials while Type D is used to test hard rubber and plastic materials. Type M, also for soft materials, was developed to test small specimens, typically O-rings, that do not meet the physical size requirements specified in ASTM D2240. Is is important to know that although each of the hardness scales are graduated from 1-100, these scales are not the same. 90 Shore A is not the same as 90 Shore D or 90 Shore M. A piece of rubber measuring 90 on a Shore A gauge will read around 42-43 on a Shore D gauge.

Figure Caption “Figure 2: Stress-Strain curve showing Ultimate Tensile Strength, Ultimate
Elongation and Modulus @ 100% Elongation”
Tensile Strength
Ultimate tensile strength, or just tensile strength, is the maximum force a material can withstand without fracturing when stretched. It is the opposite of compressive strength. Have you ever purchased a pair of shoes and they came joined together with a piece of string? Instead of getting a pair of scissors, did you opted to test your physical strength against the tensile strength of the string and try to break it by pulling on it? If the string has a low tensile strength you should be able to pull and break the string easily. You can apply more tensional force than the string can withstand. If it has a high tensile strength it will be much harder to break by pulling. Are you starting to understand tensile strength?
Tensile strength is an indication of how strong a compound is. Any time you have an application where you are pulling on the part, tensile strength is important to know. Whether your product is designed to break easily or not at all the tensile strength will let you know how the object will react to the tensional forces. A few rubber products that tensile strength are important would be bungee cords, rubber tie downs, drive belts. Some elastomeric compounds, like Silicone, have a low tensile strength making them unsuitable for a dynamic types of seal because they can fracture easily.
Measuring Tensile Strength
Tensile strength is measured with a tensometer. A tensometer is special machine that is designed to apply a tensional or compressive force to a specimen, in our case a die cut dumbbell shape, and measure how much force it takes to deform and fracture the specimen. The force is typically displayed on a stress-strain curve that shows how much force was required to stretch the specimen to deformation and ultimately break.
Elongation
Maximum elongation, with respect to tensile testing, is the measure of how much a specimen stretches before it breaks. Elongation is usually expressed as a percentage.
I had an application where a very small O-ring with an inside diameter of .056 inches had to stretch over a rod with a diameter of .170 inches. A Nitrile O-ring worked fine since it’s ultimate elongation was well over 400% and the O-ring was able to withstand the 200% stretch during installation. But when we tried to use a fluorocarbon compound several of the O-rings were breaking during installation. This fluorocarbon compound had an ultimate elongation of 150% and could not withstand being stretched to over 200% during the installation and the o-ring would break.
Measuring Elongation
Elongation is measured with a ruler or an extensometer. An extensometer is an electronic ruler that is attached to the tensometer and will measure the extension of the specimen while torsional force is being applied. Another way of measuring elongation is with a regular ruler. To measure the elongation with a ruler, make two bench marks 1 inch a part on the specimen. This is the Initial Gage Length (Lo) and then measure the distance between the marks just before the specimen breaks. This is the Final Gage Length (Lx). Calculate the elongation with the following equation:
elongation % = 100( Lx – Lo ) / Lo.
Tensile Set
While we are using bench marks, let quickly talk about Tensile Set. Tensile Set is the extension remaining after a specimen has been stretched and allowed to relax for a predefined period of time. Tensile Set is expressed as a percentage of the original length. Tensile set results are not found on the stress-strain curve. It’s a measurement that can be performed after the tensile strength test. Do not mistake Tensile Set with Elasticity. Elasticity is the mechanical property of a material to return to its original shape where Tensile Set is the amount on extension remaining after being stretched.
A rubber band would have a low Tensile Set percentage. After stretched it relaxes close to, if not exactly to, its original length. Now take a piece of Teflon and stretch it. It does not return to its original length and it stays in its stretched state. This would have a high Tensile Set percentage.
One test we perform in our Q.C. inspection is to pull on the O-ring and see how fast and how close it returns to its original diameter. The O-ring should fairly quickly return close to its original diameter. Often times a seal has to be stretched during installation and the last thing you want to happen is the O-ring stay stretched and not fit which could cause problems during assembly.
Measuring Tensile Set
Remember the 2 bench marks 1 inch apart on the specimen in the elongation test? To determine Tensile Set after break, wait 10 minutes after the specimen breaks and then fit the two halves of the specimen back together so there is good contact along the full length of the break. Measure the distance between the bench marks. Use the same equation used in the elongation test except the Final Gage Length (Lx) is the final measured distance between the bench marks.
Another way to test without breaking is to stretch the specimen to a specified elongation and hold for 10 minutes. Release the specimen as quickly as possible, making sure not to allow it to snap back, and let sit for 10 minutes. Measure the distance between the bench marks. Again, use the same equation used in the elongation test except the Final Gage Length (Lx) is the final measured distance between the bench marks.
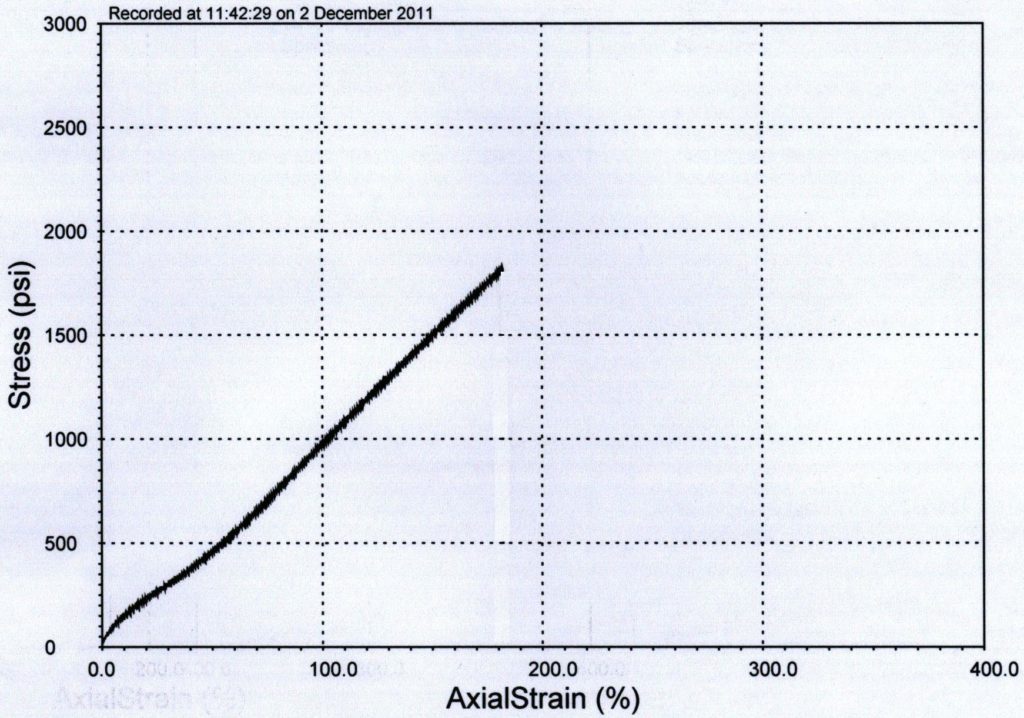
Figure Caption “Figure 3 – The steep slope would indicate this material is the tougher of the two material curves shown.”
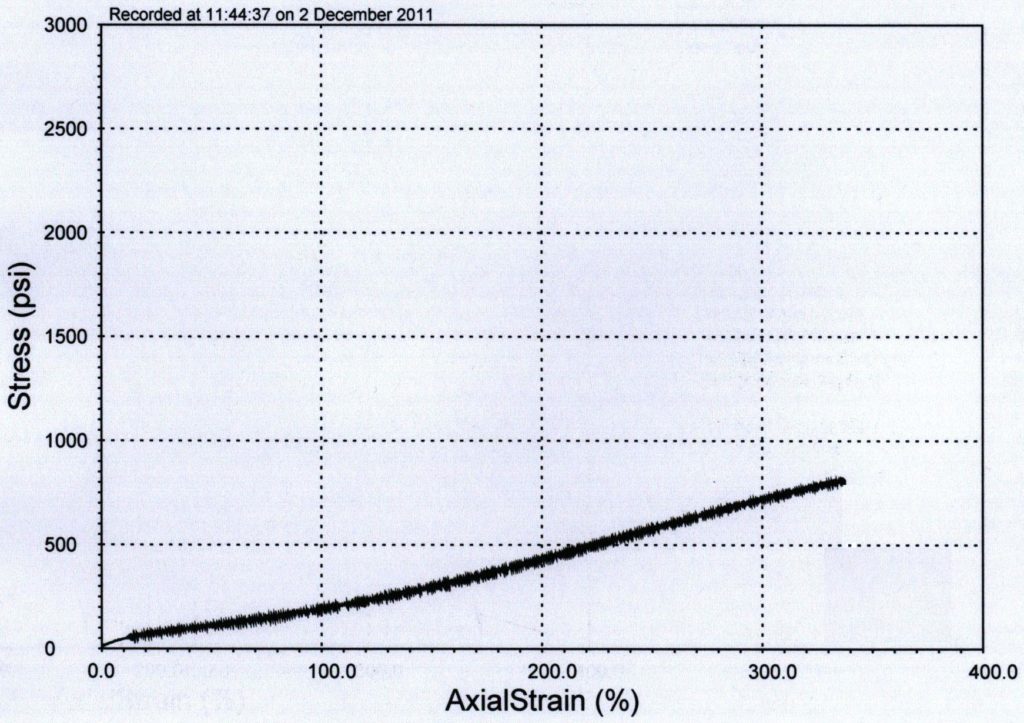
Figure Caption “Figure 4 – The shallow gentle slope shown on this curve would indicate this material is not very tough.”
Young’s Modulus
Young’s Modulus is also known as Tensile Modulus, Elastic Modulus and Modulus of Elasticity (“Measure” of Elasticity). It’s the measure of the stiffness of the material. You will see this on a physical property data sheet written something like “Modulus @ 100% Elongation.”
When performing a Tensile Strength test a plot is made of the stress vs. strain or amount of force required to stretch (deform) the specimen given length. This plot is called a stress-strain curve. The peak of the curve is the Tensile Strength and the Young’s Modulus is the slope of the stress-strain curve. If you have a steep curve the specimen resists deformation (it’s tougher) and a if the slope is gentle the material will deform easily.
At any given point on the stress-strain curve we can read the Tangent Modulus. “Modulus @ 100% Elongation” says we want to know the amount of force required to stretch (elongate) the specimen 100%. We can also ask for Modulus @ 200% or any given point on the stress-strain curve.
Knowing how easily a material deforms under strain can be important in some applications. An engineer was installing a rubber seal on a door. The rubber he used had high modulus. The door was hard to close because the rubber resisted being deformed. He then used a compound with low modulus that deformed easily allowing the door to close easily.
Measuring Young’s Modulus
Young’s Modulus is measured during a Tensile Strength test. As stated above, when performing a Tensile Strength test a stress-strain curve is plotted. The slope of this curve is the Young’s Modulus and any point on that curve is a Tangent Modulus.
Young’s Modulus (Linear Elastic Region) and Yield Point (Strength)
Yield Point
Yield Point is the force at which the specimen starts to deform permanently. It is difficult to point to the exact Yield Point on the curve because the transition is gradual, so a 2% offset (0.2% for metals) from the Linear Elastic Region is used to indicate the Offset Yield Strength. Although Yield Strength is meant to show the exact point where the specimen becomes permanently deformed, a 2% offset is an acceptable sacrifice because of how much easier it makes it to determine yield strength.
Just prior to the Yield Point is the Linear Elastic Region. The slope of the line in this region is called Young’s Modulus. This is the area which the specimen retains its elasticity. When the force is removed in this area the specimen will return to its original shape. After this area the specimen transitions from elastic to plastic behavior. This means that after the Yield Point, permanent deformation occurs in the specimen and it will no longer return to its original shape. Here is where I am going to throw a curve at you. In most elastomer stress-strain curves you will not see a definite yield point or plastic region. The elastomer specimen will remain in the linear elastic region throughout most of the curve as shown in the figures 3 and 4 except Urethane compounds shown in figure 5.
To summarize the above properties lets take a look at the stress-strain curve that is generated during the Tensile Strength test, see figures 2 and 5.
Ultimate Tensile Strength
The amount of tensional force required to fracture a specimen.
Ultimate Elongation – the amount a specimen deforms by stretching.
Young’s Modulus – The slope of the stress-strain curve that is generated during a tensile strength test.
Tangent Modulus – Any point on the stress-strain curve.
Yield Point
The force at which a material will begin to deform permanently.
Hardness – The measure of how resistant solid material is when a force is applied. There are 3 main type of hardness measurements, scratch, indentation and rebound.
Tensile Set
A measurement showing the extension remaining after a specimen has been stretched and allowed to relax for a predefined period of time. Tensile Set is not show on the stress-strain curve. Is is a measurement that can be done after a tensile strength test.
So far we talked about properties where tension force was applied to the specimen. Some of these properties were tensile strength, elongation, modulus, and yield point. Now lets talk about compression set, compression-deflection and tear resistance, where compressive and sheer forces are applied, as well as weathering, ozone and low temperature resistance. Lets get started with compression set.
Compression Set
The purpose of the compression set test is to measure the ability of the rubber specimen to retain its elastic properties after compressive forces have been applied for a prolonged period of time at elevated temperatures.
Compression set results can be useful to know when rubber seals, mounts or dampeners are subject to compressive forces in the application. This is particularly important when the seal is in a prolonged compressed state and even more so when simultaneously being exposed to elevated temperatures.
When an O-ring is squeezed the rubber has elasticity. It wants to go back to its original shape. This elasticity is how the O-rings seals, especially under low or no pressure. When pressure is applied to the system the O-ring seal pushes against the groove wall opposite the direction of the pressure, forcing it to expand perpendicular to the direction it is being squeezed. This expansion provides additional sealing capability. When an O-ring is squeezed and subjected to excessive heat it can loose some or all of its elasticity and take a permanent set. Then, when you pull the o-ring out it no longer has a nice round cross section but instead has flat spots were it was squeezed in the application. This permanent set will reduce the sealing ability of the O-ring. The compression set test is a great way to see how the compound will react to compressive forces while subjected to heat. Also, poor compression set along with poor tensile strength can be an indication of the state of cure of the specimen. If you don’t cure the compound enough these properties will diminish.
How to Test Compression Set
The specimen, usually a molded rubber disk, is squeezed between two metal plates to about 75% of its original thickness and then placed in an oven at elevated temperatures for a period of time. After the specimen comes out of the oven and is allowed to cool, measurements can be taken and the percentage of original deflection is calculated.
The original deflection is the amount you compressed the specimen in the fixture. If you have a 1 inch thick specimen and compress it to 0.750î thickness, the original deflection is 0.250î. Now lets say the 1 inch thick sample measured 0.875î thick after the test. It took a 0.125î set. 0.125 is 50% of the original deflection of 0.250î or a compression set of 50%. The higher the percentage the poorer the results.
You may see “Method A” or “Method B.” Method A is compression set under a constant force and Method B is compression set under constant deflection. Method B is the primary method used throughout the ASTM D2000 specification.
Compression-Deflection
The purpose of the compression-deflection test is to compare the stiffness of the rubber materials under a compressive force. This test can tell you how much a part will deflect under a given load or, alternatively, how much load it will take to deflect a part a given distance. Rubber mounts and dampeners are some examples of parts that are subject to compressive forces and knowing the relationship between compressive forces and deflection can be important.
How to Test Compression-Deflection
Compression-Deflection is measured on a compression testing machine or can be measured on any other type of machine that can apply a measurable force to a specimen at a given rate and be able to measure the deflection to one thousandths of an inch. At Satori Seal our tensometer can apply compressive force at the specified rate and also measure the deflection. The test is performed by compressing the specimen to a specified compressive force and measuring the deflection results or compressing to a specified deflection and measuring the compression force results.
Tear Resistance
The tearing of rubber is a mechanical rupture process started where forces are concentrated in an area usually caused by a cut, defect or deformation.
How to Test Tear Resistance
Tear resistance is tested on a tensometer in the same manner as the tensile strength test except the specimen is one of 5 specific shapes: Type A, B, C, T or CP. A graph is produced in the same manner as the stress-strain curve except the Tear Strength graph is force over jaw separation length. Tear strength is calculated by taking the maximum force divided by the median thickness of the specimen (Ts = F/d).
Type A – Crescent shaped specimen with a nick or cut
Type B – Tab End specimen with a nick or cut
Type C – Right Angle specimen with a nick or cut
Type T (Trouser) – Molded block, 150 X 15 X 2mm, with a 40mm cut
Type CP (Constrained path) – Molded specimen 125 X 28.5 X 5.33mm. This is a special molded shape with fabric reinforcement molded in the mid-plane of the sample. The specimen has a narrows groove down the length in the center.
Ozone Resistance
Ozone (O3), resistance is used to test the relative ability of the rubber compound to resist outdoor weathering or ozone chamber testing. Some applications like door and window trim would be subject to weathering so testing would give an estimation of how the rubber compound will react to weathering. Other sources of ozone exposure include air purifiers and ozone generators used to purify, deodorize, disinfect and kill bacteria in just about everything from air to food.
How to Test Weathering/Ozone Resistance
ASTM Method D1171 addresses how to test weathering and ozone resistance. In D1171, rectangular cross section samples are wrapped around a wooden mandrel and left in the sun or placed in an ozone chamber. After a period of time either method A or method B is used to grade the samples. In method A no cracking is permitted under 2X magnification and in method B, three samples are checked and graded depending on the severity of cracking and given a quality retention value (expressed as a percentage) derived from Table 1 in ASTM D1171.
ASTM Method D1149 is used to test the effects of specific levels of ozone concentration on specimens that are under dynamic or static surface strain conditions.
Low Temperature Resistance
There are two low temperature tests that are used in testing low temperature properties of elastomers, ASTM D2137, Low Temperature Brittleness, and ASTM D1379, TR-10/TR-70 Temperature Retraction test. Low Temperature Brittleness is the most common low temperature test you will see on a physical properties data sheet. The temperature retraction test is not as common but will give you more accurate continuous operating low temperature results and a better indication of the viscoelastic and crystallization effects at low temperature.
ASTM D2137 – Low Temperature Brittleness
The Low Temperature Brittleness test is use to determine the lowest temperature at which a rubber specimen will not exhibit fractures or cracks when subject to a specific impact condition. There are two tests methods, A and B. Test Method A is for rubber volcanizates and Test Method B is for rubber coated fabrics. This test is useful for development purposes but may not necessarily indicate the lowest temperature at which the compound will operate. The TR-10/TR-70 Temperature Retraction Test is more effective in determining the lowest temperature at which a compound will continue to operate.
How to Test Low Temperature Brittleness
Specimens are cut from a die and placed into a fixture. The specimens are immersed into a liquid bath at the specified test temperature for a determined length of time. After immersion deliver a single impact to the specimen and note any cracks, fissures or holes visible to the naked eye. Repeat the test at the next highest temperature (usually 10∞C increments) until the specimen passes with no cracks, fissures or holes.
ASTM D1379 – TR-10/TR-70 Temperature Retraction
The TR-10/TR-70 Temperature Retraction test is used to evaluate the crystallization effects and viscoelastic properties of the rubber specimen at low temperature. This test will give you a better indication of compounds lowest temperature at which it will continuously operate.
How to Test TR-10/TR-70 Temperature Retraction
This test is performed by stretching a die cut specimen in a special fixture to 250% elongation or 50% of the ultimate elongation if 250% can not be obtained. The stretched specimens are immersed in in a liquid at -70∞C for 10 minutes freezing the sample to a state of reduced elasticity. Now, after releasing the specimens, slowly raise the temperature of the samples and measure the temperature and length of the specimens at 2 minute intervals. Report the temperature at which the sample retracted 10% (TR10), 30% (TR30), 50% (TR50) and 70% (TR70).
The TR10 value can be used to indicate the low temperature at which it will continuously operate, and it also correlates with the brittle point. The greater the temperature difference between the TR10 and TR70 the greater the tendency of the rubber to crystallize. TR70 also correlates with low-temperature compression set.
Understanding the physical properties of rubber will help you determine what properties are important to your application.